Starting a blog is exciting, but many people stare at a blank screen for ten minutes and then close the tab. I know the feeling. Writing a blog doesn’t mean writing like a professional. It just means explaining something clearly to another person. Here are the steps I wish I had known when I wrote my first post.
Table of Contents
My Story
When I first began blogging, I didn’t really know how to start or what to write about. At first, I relied on AI to generate the content because it seemed easier, but the writing didn’t feel natural or like my own voice.
I also struggled with choosing topics, creating headings, writing introductions, and organizing my ideas. Sometimes I would stare at a blank page and feel stuck on what to write next. Grammar and sentence structure felt confusing. So did SEO, especially keywords, meta descriptions, and SEO-friendly URLs. Finding suitable images and using alt text were new challenges too.
Over time, I started learning step by step. I realized I didn’t need to be perfect to start a blog. I just needed to keep practicing, do proper research, and write in my own words.
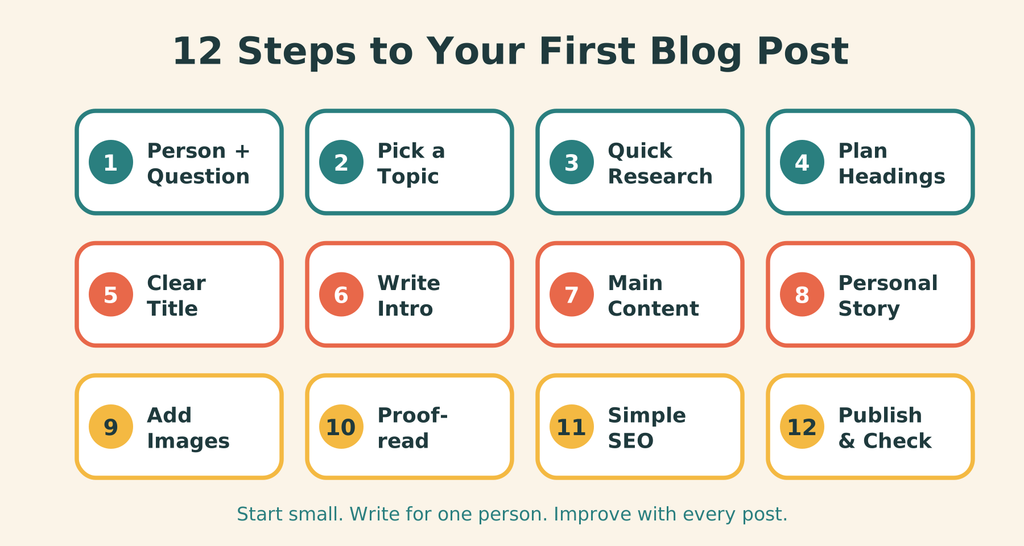
Step 1: Pick One Person and One Question
Ask yourself who will read this and what they are looking for. Don’t write for everyone. Imagine one person, like a classmate or a younger cousin who asked you something.
A good example is “How do I make revision notes from a PDF?” That is one person and one question, and your whole post should answer it. Once you know the question, writing gets much easier.
Step 2: Choose a Topic You Can Explain
You don’t need to be an expert, but you do need to understand the topic well enough to explain it. If you don’t really understand something, readers will notice straight away.
A good way to start is to write down five problems you or your friends faced recently, like making a CV or learning a new app. Each one can become a blog post.
Step 3: Do Some Quick Research
Read two or three other blogs on the same topic. Don’t copy them. Look at what they covered and what they missed. Maybe a step wasn’t explained clearly, or they skipped common mistakes. That gap is your chance to do better.
If you include facts, figures, or rules, check them on an official or reliable source. Things change, so double-check.
Step 4: Plan Your Blog
A plan is just a list of headings. It takes about ten minutes, saves a lot of time later, and stops you from going off-topic.
For a post called “How to Create a Study Timetable”, the plan could be:
- Why a Timetable Helps
- Step 1: List Your Subjects
- Step 2: Decide How Many Hours You Have
- Step 3: Add Short Breaks
- Common Mistakes
- Final Thoughts
If you can’t think of headings, you probably need to learn a bit more about the topic first.
Step 5: Write a Clear Title
A good title tells the reader what they will gain. Simple usually works best: “How to Create a Study Timetable” is better than “The Ultimate Secret to Perfect Studying.”
Avoid titles that promise too much, like “Earn Money in One Day”. They mislead readers and can cause problems if the claims are false.
Step 6: Write the Introduction
Keep it to 3-4 sentences. Say what the post is about and what the reader will learn. Starting with a small problem the reader has works well.
Don’t spend too long on it. Many beginners write long introductions because they don’t know how to start. My tip is to write it last.
Step 7: Write the Main Content
Write under each heading. Keep these in mind:
- Use short sentences and short paragraphs.
- Use simple words.
- One idea per paragraph.
- Use steps or bullets to explain a process.
- Give examples.
Write as if you are talking to a friend. In your first draft, don’t worry about grammar. Getting your ideas down matters more, because a rough draft is better than an empty page. You can fix the writing later.
Step 8: Add Your Personal Experience
This is what makes your post different from the thousands of others online. If you tried something yourself, say so. Mention mistakes you made, screenshots you took, or small tips you picked up. Even one or two sentences make a post feel real.
Be honest and only write what you actually did. If you haven’t tried something, say “I haven’t tried this myself.”
Step 9: Add Images
Images make a post easier to read. Use screenshots, simple graphics from Canva, or your own photos. Be careful with images from the internet, because many are copyrighted. Use your own or free image sites, and add a short alt text to each one.
Step 10: Proofread
Never publish your first draft. Take a short break, then read it again, out loud. If a sentence sounds wrong when you say it, it will sound wrong to the reader too.
Check for:
- Spelling and grammar mistakes
- Very long sentences
- Wrong facts or broken links
- Whether you actually answered the reader’s question
If you can, ask a friend to read it and tell you what is confusing.
Step 11: Add Simple SEO
SEO helps people find your blog on Google. As a beginner, the basics are enough:
- Use your main topic naturally in the title and through the post.
- Write a short meta description.
- Keep your URL clear, like how-to-make-a-study-timetable.
- Don’t repeat keywords too much. Write for people, not for Google.
Step 12: Publish and Check

After publishing, open your post on your phone. Check that images load, headings look right, and links work. It takes two minutes and you will often catch small mistakes.
Common Mistakes Beginners Make
- Copying from other websites. Avoid this completely. It can hurt your site and your Google ranking.
- Writing too little. A very short post often doesn’t answer the question.
- Letting AI write everything. AI can help with ideas or grammar, but the post should be in your own words. I tried this at the start and it never sounded like me.
- Not checking facts. Verify everything yourself.
- Waiting to be perfect. Publish, learn, and improve with the next post.
If you are new to freelancing, you can also read our guide on
10 Skills to Learn as a Beginner Freelancer
Our Note
Following these steps does not guarantee traffic or income. Blogging takes time, practice, and patience, and everyone’s results are different. This is general information only.
FAQs
How long should my blog post be?
There is no fixed length. Write enough to answer the reader’s question properly.
How often should I post?
Regularly is better. Pick a pace you can keep up.
Can I use AI?
Yes, for ideas, planning, or checking grammar. But write in your own words, add your own experience, and check everything yourself.
Do I need to be a good writer?
No. Keep it simple and clear.
Final Thoughts
Blogging gets easier the more you do it. Write for one person and one question, keep your plan simple, write in your own words. Your first post won’t be perfect, but each one will be better than the last.